|
| Arrangement made from my step-grandmother's garden last week. Roses, grasses, lavender, and sedum in a wide-mouthed glass vase create a loose, natural look. |
The more you start doing arrangements, the more your personal style will develop. I tend towards very organic, loose, informal looks that privilege texture over all else. I like using unexpected elements. However, the following tips for fuss-free floral action apply to all aesthetics:
1. Texture is key. This comes from a place of practicality. Sometimes your yard may not have much color to offer, but you can still make beautiful arrangements with an all-green array if you have a variety of textures.
2. Color is still important. Even in an all-green arrangement look for various shades of green.
3. Don't discount weeds, trees, grasses, or herbs. They can be very beautiful! "Floral" arrangements shouldn't be restricted to flowers.
4. Use your vase as a guide. Larger vases will need larger impact arrangements rather than wispy ones. Wide-mouthed vases lend themselves to looser arrangements and more stems compared to small-mouthed vases.
5. Not everything needs to look like a magazine cover. Remember, we are in the business of real life here, not creating Stepford-esque illusions. Even the most basic arrangement you come up with will elevate the look of your room.

Now for the process:
Here are the 3 vases I always keep filled in my house. Note that they are all very different, yet I can often use the same flora in all 3. It just takes some adjusting.
This is one of those times of the year when our yard does not produce much in the way of cutting flowers. While I occasionally buy flowers for arrangements, mostly I make due with the foliage in our yard.

So here is what I had growing in my yard this week: azalea branches, magnolia branches, Japanese maple branches, and "weeds." I also had some sedum, rosemary, and sage.
 |
| Cut stems at an angle |

When you start your arrangement, begin with a "frame." For example, placing the azalea branches here first provide a general shape and structure to which I can then add other elements. Always start with your most basic items (your main greenery) then add the showier pieces later.

Next add some "high-low". I used the magnolia branches an element of height and sage to create fullness near the mouth of the vase. Work on creating groupings as you add new elements: here the two sage cuttings are placed together as are the two magnolia branches in the back. However, don't make that a hard and fast rule! Note that in the arrangement I did at my step-grandmother's that there is a cluster of roses on one side balanced out by a single rose on the opposite side. In floral arranging, "rules" should always be secondary to creating balance.

Lastly, add some filler. The spiky, slender shape and reddish color of the Japanese maple branches fill out the middle of the arrangement.
Then fiddle with it until it looks balanced and pleasing to your eye. And yes, "fiddle" is a technical term here. Rotate it, fluff it, shift things around. Remember that "balanced" is not the same as "symmetrical"! Everyone has their own aesthetic, but I find that the most interesting arrangements are those that are balanced but not perfectly symmetrical. It makes for a more natural looking arrangement.
 |
| Voilá! |
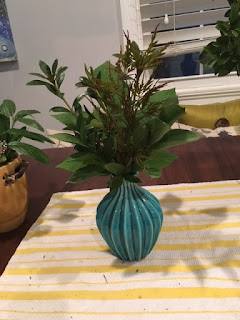
For the other two vases, I kept their arrangements more compact, as they both reside on bookshelves. The wide mouth of the yellow vase lends itself to a looser arrangement, so I used sedum here and more slender cuttings for the small-mouthed turquoise vase.

Rosemary, sedum, and some sort of weed (that I've let grown up near the air conditioner because it's pretty) pack a lot of punch into a small, simple arrangement.
Azalea, Japanese maple branches, and Israeli ruscus create a compact, structured arrangement perfect for small spaces. The ruscus is one of my favorites as it can last for months if you change the water once a week.
As with all artistic endeavors, the best advice is to make sure that you do you. Practice. Find out what you like and what you don't like. If you follow your gut and the 4 rules here and I guarantee your arrangements will make people smile.

Rosemary, sedum, and some sort of weed (that I've let grown up near the air conditioner because it's pretty) pack a lot of punch into a small, simple arrangement.

Azalea, Japanese maple branches, and Israeli ruscus create a compact, structured arrangement perfect for small spaces. The ruscus is one of my favorites as it can last for months if you change the water once a week.
As with all artistic endeavors, the best advice is to make sure that you do you. Practice. Find out what you like and what you don't like. If you follow your gut and the 4 rules here and I guarantee your arrangements will make people smile.