Thursday, September 22, 2016

Floral Arranging 101


I am a huge fan of having fresh flowers in my house. It's a simple way to give a room instant polish.

Done well, flower arranging is an art form. It can also be very intimidating. There are a lot of "rules" you can get hung up on, such as the rule that the arrangement itself should be 2 1/2 times taller than the vase or the "thriller, filler, spiller" triad. These are, in general, good rules. I belong, however, to a far more informal school of flower arranging and no one has (yet) fainted or run screaming from my attempts. Not to toot my own horn, but I get many compliments on my arrangements. They even seem genuine most of the time.

Arrangement made from my step-grandmother's garden
last week. Roses, grasses, lavender, and sedum in a
wide-mouthed glass vase create a loose, natural look.

The more you start doing arrangements, the more your personal style will develop. I tend towards very organic, loose, informal looks that privilege texture over all else. I like using unexpected elements. However, the following tips for fuss-free floral action apply to all aesthetics:

1. Texture is key. This comes from a place of practicality. Sometimes your yard may not have much color to offer, but you can still make beautiful arrangements with an all-green array if you have a variety of textures.
2. Color is still important. Even in an all-green arrangement look for various shades of green.
3. Don't discount weeds, trees, grasses, or herbs. They can be very beautiful! "Floral" arrangements shouldn't be restricted to flowers.
4. Use your vase as a guide. Larger vases will need larger impact arrangements rather than wispy ones. Wide-mouthed vases lend themselves to looser arrangements and more stems compared to small-mouthed vases.
5. Not everything needs to look like a magazine cover. Remember, we are in the business of real life here, not creating Stepford-esque illusions. Even the most basic arrangement you come up with will elevate the look of your room.


Now for the process:

Here are the 3 vases I always keep filled in my house. Note that they are all very different, yet I can often use the same flora in all 3. It just takes some adjusting.

This is one of those times of the year when our yard does not produce much in the way of cutting flowers. While I occasionally buy flowers for arrangements, mostly I make due with the foliage in our yard.


So here is what I had growing in my yard this week: azalea branches, magnolia branches, Japanese maple branches, and "weeds." I also had some sedum, rosemary, and sage.


Cut stems at an angle
When taking cuttings, always cut them longer than you will need. It's always better to cut plants down to size than to have them too short to begin with. Also, cut the stems at an angle. This will help them draw water and stay fresh looking longer. Also make sure no leaves are touching the water in the vase. The arrangement will last longer if there are only stems in the water, so remove any low-lying leaves.


When you start your arrangement, begin with a "frame." For example, placing the azalea branches here first provide a general shape and structure to which I can then add other elements. Always start with your most basic items (your main greenery) then add the showier pieces later.


Next add some "high-low". I used the magnolia branches an element of height and sage to create fullness near the mouth of the vase.  Work on creating groupings as you add new elements: here the two sage cuttings are placed together as are the two magnolia branches in the back. However, don't make that a hard and fast rule! Note that in the arrangement I did at my step-grandmother's that there is a cluster of roses on one side balanced out by a single rose on the opposite side. In floral arranging, "rules" should always be secondary to creating balance.


Lastly, add some filler. The spiky, slender shape and reddish color of the Japanese maple branches fill out the middle of the arrangement.


Then fiddle with it until it looks balanced and pleasing to your eye. And yes, "fiddle" is a technical term here. Rotate it, fluff it, shift things around. Remember that "balanced" is not the same as "symmetrical"! Everyone has their own aesthetic, but I find that the most interesting arrangements are those that are balanced but not perfectly symmetrical. It makes for a more natural looking arrangement.

Voilá!

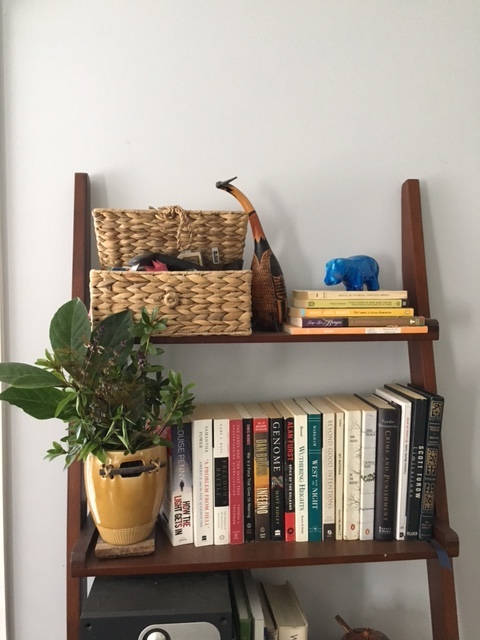
For the other two vases, I kept their arrangements more compact, as they both reside on bookshelves. The wide mouth of the yellow vase lends itself to a looser arrangement, so I used sedum here and more slender cuttings for the small-mouthed turquoise vase.


Rosemary, sedum, and some sort of weed (that I've let grown up near the air conditioner because it's pretty) pack a lot of punch into a small, simple arrangement.
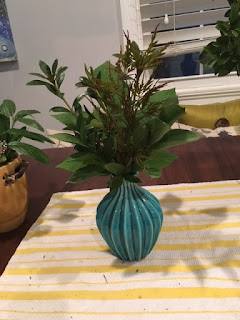


Azalea, Japanese maple branches, and Israeli ruscus create a compact, structured arrangement perfect for small spaces. The ruscus is one of my favorites as it can last for months if you change the water once a week.


As with all artistic endeavors, the best advice is to make sure that you do you. Practice. Find out what you like and what you don't like. If you follow your gut and the 4 rules here and I guarantee your arrangements will make people smile.


Saturday, September 17, 2016

Craft Paper Is Not Wine Resistant

Since July, a nail sticking out of the wall has served as my bag hook in my office on campus. Last week I finally decided this had to change. Not only was the nail scuffing up the faux leather handle of my schoolbag, but it only allowed me to hang one thing at a time. Come winter, where would I put my coat? What if I had office guests who also had coats?? A solitary nail could not meet these needs. Winter is coming, and the code of good hostessing requires coat hooks. Clearly a crafting session was in order.

I found a piece of wood in the shed that was roughly 14" x 5". I sanded the edges and applied a single coat of stain to the side with the most interesting grain.

After stain
Before stain


I had saved the knobs that came with my armoire before I refinished it, so repurposed 3 of them as "hooks" for this project. I spray painted the knobs using an oil-rubbed bronze color left over from painting planters. This gave them a subtle bit of shine.


On the back side (unstained side) of the wood I marked where the knobs should go then drilled the holes for the screws. When pre-drilling a screw hole, remember to choose a drill bit that the same size or slightly smaller than the screw itself so the threads can grip the wood rather than rattle around inside a too-large hole. Also, the old adage of "measure twice, cut once" applies here as well.

I now had the basics complete: a piece of wood with 3 "hooks." The next step was to spruce it up a bit. If you recall, my office on campus is a peculiar combination of dried blood-colored walls and teal trim. I needed a to design a hook that was neutral in palette but still visually interesting. I also wanted a texture that contrasted with the wood but still felt organic. I had some craft paper on hand so I played around with color and pattern combinations.

Mondo Guerra: pattern guru
For those of you who are/were Project Runway fans, my decorating aesthetic runs parallel to Mondo Guerra's fashion aesthetic: more pattern, more better! Not surprisingly, then, I chose two papers with contrasting patterns: a dark grey diagonal stripe and a golden honeycomb design. Both were geometric in nature and contrasted nicely with the organic swirls of the wood's grain.


I chose the diagonal pattern as the base paper and layered a narrower piece of the honeycomb paper over it using ye olde Elmer's gluestick. No need to get fancy, folks. I made three of these then glued them to the board, one centered over each screw hole.

Then I spilled a glass of red wine on it. Herein I discovered that craft paper is not wine resistant. Happily, I had extra paper but there's a life lesson here: when crafting, go stemless.


With the knobs screwed in over the (new) paper background, I was pretty pleased with the overall effect. Plus, I had now tripled my "storage" space. The fact the wood was faintly scented with pinot noir was an added bonus.
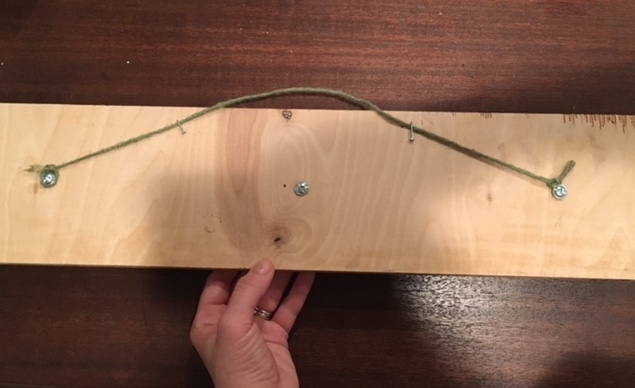
A piece of gardening twine serves as a practical and durable hanger. Tying each end of the twine around the outside screws and then tightening the screws keeps the twine secure. As the knobs made the piece front-heavy I took two small nails, hammered them partway into the board, and bent the rest over the twine on each side near the top of the board. This anchored the twine firmly against the board, preventing the board from leaning out away from the wall when hung.


And there you have it! A homemade hanger that has my office ready for the demands of winter apparel. A few scrap materials, a little ingenuity, a little wine, and a little time. That's how I do nesting.


Saturday, August 27, 2016

Placemaking

I am a proponent of the "a place for everything and everything in its place" policy of homemaking. Containing the clutter in a neat, organized, easy-to-access fashion is particularly important in small spaces where storage is at a premium.

Baskets are my favorite storage solution, and they feature prominently in our home. Brick and mortar stores such as Pier One, Home Goods, and TJ Maxx often have sales on their baskets and online venues like Overstock and Amazon also have reasonably priced basketry. Aside from their affordability, their wide variety of shapes and materials make baskets a practical storage option for almost any space and content.

In our living room a large grass basket is perfect for holding magazines while a ceramic bucket holds dog toys. As opposed to a true basket, the weight of the ceramic bucket keeps it from tipping over when the kids root through it.


On a bookshelf a lidded, braided basket serves as a catch-all for sunglasses, wallets, and others odds and ends as we come and go from the house. This makes it easy to keep track of our items while also keeping them safe from doggy teeth. From an aesthetic point of view, it also adds some nice texture to the shelfscape.


In the laundry alcove, matching baskets keep laundry supplies, household cleaning items, and pet supplies easily accessible yet out of sight. These medium-sized baskets are surprisingly spacious, making them the perfect choice for organizing an abundance of items this tight space. A fourth, smaller basket holds cleaning rags.


However, the pièce de résistance of basket employment in our house is the hall "closet" space. This series of open shelving offers much needed storage, but as a person who hates clutter the idea of open shelving initially horrified me.

Finding a way to keep all our linens, extra blankets, towels, medications, and medical supplies out in the open -- without looking cluttered -- was key. Fortunately, my little binder of inspiration came through once again with this organizational gem from the January 2015 issue of Southern Living.

Reassured that open shelving can be both functional and attractive, I set to work translating this idea for our own home. Ultimately, a combination of neat folding and basketry created an easy to maintain storage space.

On the lowest shelf a basket reduces confusion by keeping sheets for the guest bed separate from the master bedroom sheets. Baskets on the middle shelf hold medications, medicines, vitamins, and all the items our small bathroom cabinet cannot accommodate: spare razors, lint rollers, sunscreen, and so forth. On the top shelf a round, linen-lined basket holds bubble bath, essential oils, and other pampering materials.

The curtain on the bottom, made from leftover upholstery fabric, hides the baby gate protected litterbox (or, as the dogs view it, "treat box") along with spare litter and scoop.

Overall, employing baskets to organize my clutter has been one of the smartest organization decisions I've ever made. I have owned almost all of the baskets featured here for years, and in every apartment and house I've lived in they have proved both versatile and essential. 

So join me on Team Basket and see for yourself why baskets have been used for centuries and across civilizations: they are awesome. 


Friday, August 12, 2016

Grad School: It Ain't Glamorous!

The view from my window. Note the missing
screen, providing an unobstructed view of this
cement wonderland and a point of
ingress for inquisitive squirrels.
I spend about 20 hours a week in my office on the university campus. Located in the underbelly of the football stadium, the student offices for my department come with all the amenities one would expect from the underbelly of a stadium built in 1921 that routinely hosts crowds of over 100,000 people: mice, cockroaches, and asbestos warnings. It may not be pretty, but it certainly has plenty of character.


I share my office with up to 3 other people at any given time, so carving out a personalized spot is key for keeping one's sanity. There isn't much I can do about the dried-blood colored cinderblock walls, teal trim, fluorescent lighting, 1980s industrial furniture, or my wonderful office mate's views on "office organization," but I am working on making the most of the space.

Seriously, Tyler. What is this??


My little corner of paradise may not look like much, but it happens to be the premium desk space in the office. Seniority has its perks. It boasts both a radiator and a window, its own private filing cabinet, an easily accessible wall outlet, and is on the opposite side of the room from the pipe with the asbestos warning.

I consider myself a very lucky girl.


The lack of color coordination borders
on the perverse. I admit the red
microwave was my doing, though. 
A new building is being constructed for our department, but for decades we have been housed beneath the football stadium. Ergo, for decades the student offices have collected hand-me-down items left behind by former graduate students. In my office, dorm room-esque decor left behind by a 2014 graduate furnishes a reading nook while various office mates have contributed to a kitchen area complete with microwave, mini-fridge, electric teakettle, and no less than 2 coffee makers.

As a side note:
In my 3 years here, it has become clear that there are 3 types of office mates: those who leave useful items behind (like our reading nook furniture and books), those who leave their crap behind (like old exams and half-eaten tins of peanuts), and those who take everything with them. A 2015 graduate even took the lightbulbs from the lamp by her desk, which is a level of thriftiness that deserves respect. Don't be a #2, folks.

When spending so much time in such an unappealing space, keeping up morale is key. For me, this means surrounding myself with pithy humor and reminders of all the cool fieldwork I get to do.

This doesn't cancel out the threat of industrial-sized cockroaches dropping from the ceiling, finding a mouse infestation in your desk drawer, or returning from the bathroom to find a squirrel perched on the radiator (all of which has happened to me) but it helps remind me why I put up with all that. And think of all the character I'm building!


Original art, photos, and souvenirs from fieldwork and travel around the world are mixed with family memorabilia. The handwoven blanket that covers my filing cabinet belonged to my grandmother.


As I write this post it occurs to my that I really need a potted plant here. Some sign of life that can't be classified as "vermin."


The Far Side comic that my mother sent me on my 19th birthday my first year of college is one of my most prized possessions. It has taken pride of place in every office space I've had since. I may study post-conflict zones rather than ancient Egypt now, but the sentiment still applies!


A sign with dark humor and a series of original  3-D art pieces found in a downtown Kansas City art gallery add visual and textural interest without competing with the -- let's call it "strong" -- wall color.


My point here is that sometimes carving out a tolerable, personalized haven in a less-than desirable space is enough to make that space enjoyable. In the case of my office, I think its crappiness ends up being part of its appeal. This funky, filthy, eclectic, shared space filled with hand-me-downs is a reminder that graduate school is still "college." I am grateful for this opportunity to continue my education and I know I'll look back at this time in my life with great nostalgia. I might even miss the stadium when we move into our shiny new building next year.

Maybe.


Friday, August 5, 2016

Bubble Baths and Balance: Redefining Bliss

Sometimes it feels like everyone is in a competition over who is the busiest. My friends with small children one-up each other by competing over who showered the longest ago. My graduate school peers compete over the number of looming deadlines for publications, grants, or job applications. My friends with jobs compete over who works the most hours in a week or whose boss is the most demanding.

At the same time everyone is fascinated with stories of people who quit their corporate jobs to "follow their bliss" and are now private yoga instructors in some fabulously exotic tropical place. They only own 1 pair of shoes and live in a shack on the beach and they are the happiest they've ever been. At least twice a day I see sponsored stories like this on my Facebook feed with the promise that I, to, could achieve this kind of life.

There is a perversity to this dichotomy. Do we really have to go to either extreme to feel satisfied? To feel accomplished and happy? Whatever happened to the search for balance?

Recently I've been feeling particularly overwhelmed. The end of the summer semester is coming to an end with just one week left before the start of fall semester. There are lesson plans to make and papers to grade and exams to write and books to order and start-of-the-year newsletters to put together and mentorship programs to organize and budgets to set. I bounce from my teaching job to my office job every day in a mad dash between downtown and the western suburbs. In between I'm supposed to find time to do international research and write a dissertation. I'm sure this sort of schedule sounds familiar to many of you; even if the particulars aren't the same the general sentiment is.

I firmly believe that everyone needs a refuge to keep their sanity. A hobby, a quiet place to contemplate life, a passion they pursue just for sake of their own happiness. This blog is one of my self-care indulgences. My garden is another. Both have ended up neglected of late. As I grow overwhelmed and put all my attentions towards school and work, the things I do simply to bring me happiness somehow get pushed aside. It's been almost 2 weeks since my last blog post. As for my garden, caterpillars moved in and in one day decimated my kale crop. My blueberry bush is refusing to fruit. White flies killed 2 of my 4 green bean plants and my dill plant bolted. Half my cucumbers turned yellow before they were ready for picking, and my bell pepper plant has acquired a blossom rot problem. My little sanctuary isn't faring so well.

Many of us put ourselves last. Our hobbies are labeled "less important" than our jobs. But am I doing myself any favors by neglecting to invest in self-care and feeling burnt out? Alternatively, if I gave it all up to live in a shack on the beach and own 1 pair of shoes would that bring me bliss? Probably not. What really makes me the happiest is when my life has balance.

In an attempt to regain some balance before the impending school year I set aside Wednesday night for some "me" time. No checking my email, no tweaking my syllabus or thinking about data collection methods or grant deadlines. I did some work in my garden then poured a glass of wine, downloaded a new mystery on my Nook, and ran a bubble bath. It was heavenly.

Saffi, the bringer of gifts.
As I marinated in my bath one of our dogs, Saffi, nosed her way into the bathroom. Looking very pleased with herself she dropped a gift into my bath. A chewed up, still twitching cockroach floated on the cloud of bubbles next to my shoulder. The conditions for relaxation no longer ideal, I concluded that "me" time was over. I praised Saffi for her thoughtful gift, disposed of the bug, poured a much larger glass of wine, and tried to convince myself that cockroaches are loners and always live by themselves.

Self-care can be difficult. It always feels like there are more pressing matters to attend to than ourselves, but even a few minutes a day can make a difference. My relaxing evening may have been cut short, but even the hour I managed to fit in left me feeling re-energized. Indeed, I'm not sure I have ever moved so quickly in my life as a I did to exit that bath. I set aside time for myself for the first time in a while, and that's a step in the right direction!


Saturday, July 23, 2016

Return of the Stencil

You didn't think I went through all that trouble to make my DIY stencil just to do one project, did you? Heck no. Those things are reusable for a reason! So here was my next project: a wall-mounted coat rack for the hallway.

We needed someplace other than our bed to put guests' purses and coats (as well as our own when feeling lazy) and our little hallway has been woefully bare since...The Zoo Incident.

Let me back up to October 2015. The scene? Our wedding reception. We had a wide-matted picture frame and some metallic Sharpies on a side table for guests to sign their well wishes. It was an idea I'd poached from a friend and the end result was both beautiful and meaningful. We planned to put our favorite photo from the wedding in it and hang it in the hallway.

David's father reads the well-wishes left by friends and family.
Zoo, bringer of destruction
Fast forward to November, when we agreed to foster this little guy who had showed up in our yard one day. We named him Zoo. At roughly 3 months old, he needed to be potty-trained and we watched him like a hawk. Or so I thought. Turns out he had been sneaking off to pee under our guest bed. Which is where I had stored our wedding frame until we could choose and print our favorite photo. Needless to say the wedding frame was ruined and since that time I haven't had the heart to think about framing wedding pictures. As such, our hallway has remained naked.

In a house of roughly 900 square feet, however, no space can go un-utilized for long. We needed a coat rack and the hallway was the obvious place to put it. I thought about buying one, but making one sounded way more fun.

We had some spare bits of wood left over from building the addition to my garden. David makes fun of me for hanging on to wood scraps but it's a trait I inherited from my father and I really enjoy coming up with creative ways to use them. I chose one of these scraps, sanded it smooth, and stained it with a blend of mahogany and ebony stains to bring out the grain. I then applied my stencil using the same terra cotta and ochre paints I'd used on the armoire. When it dried I applied a low gloss urethane which deepened the stencil colors and gave the paint a slight translucence.


When I was choosing the knobs for the armoire I had ordered four different styles to see what I liked best. I picked one style for the armoire but this left me with three other knobs of different shapes but in the same coppery-bronze color. Never one to let something go to waste, I used these for the pegs on my coat rack. Ta da!! Not a bad afternoon's work, I'd say.


The hallway clearly still needs work, but at least it's a start! To me unique, handmade pieces like this are what give a home real heart. Sure, I would have preferred to showcase a wedding photo surrounded by messages of love and well-wishes from our most beloved friends and family, but on the upside we had the satisfaction of finding a loving forever home for a puppy in need. Plus, I got to prove to David (once again) the value of my scrap wood collection. If you can't hang the thing you love, at least love the thing you hang.

Tuesday, July 19, 2016

That Time I Took DIY Too Far

In a fit of organizational pique this Spring I decided our home needed more storage space. Our one non-bedroom closet -- located between the kitchen and mudroom -- was crammed with art supplies, pet food, tools, gardening equipment, cleaning supplies, Christmas decorations, camping equipment, sports equipment, and storage for our recycling. I hated that closet.

I decided adding an armoire to the mudroom was the way to go. Armoires are extremely versatile and can be used in multiple rooms for a variety of purposes, which fits well with our propensity for moving. For a few weeks I scoured Craigslist but almost everything listed was sized for a Texas McMansion. In addition armoires have apparently become popular as entertainment centers, so many had random cutouts in the back wall for power cords and wiring. This really didn't fit my needs.

In an antique mall down the street I found an armoire that was perfect. The chalkboard look wasn't for me but it had the vintage charm and sturdy construction I wanted as well as the storage space I needed. Plus, I'd been itching to try furniture stenciling and this seemed like the perfect opportunity.

A diamond in the rough!
I trotted off to my local craft store to purchase a stencil and completely struck out. I wanted a geometric tribal vibe but everything was either French or floral. I did find a few styles online, but this approach had two drawbacks: a.) I was impatient to get started and b.) the ones I really liked were expensive and I'd blown my budget on the armoire.

"I'll make my own stencil!" I declared. I bought a pack of plastic sheets designed for stencil making and headed home feeling ambitious.

I should mention here that I define myself as "handy" and "creative" rather than "crafty" or "artistic." I don't own cool crafting supplies like stencil-cutting devices. What I had was a box cutter. After studying a few different designs online I drew a basic tribal pattern onto the plastic sheeting and prepped a new blade in my box cutter. 

My half stencil
I understand now why pre-made stencils can be so expensive, and why proper materials make success so much easier. After a few hours, much swearing, and two bleeding fingers I had cut out exactly half of the stencil. I didn't think I'd survive cutting out the other side so I just cut the rest off and planned to flip my half-stencil as needed. The triangles were all uneven, but since I was going for a rustic look anyway I wasn't too concerned.

There was no sealant on the armoire, so I sanded it just enough to abrade the surface and painted it with a glossy dark blue paint left over from my breakfast nook bench. I considered watching some Youtube videos for stenciling tips, but figured since I'd made it through a master's degree and most of a doctoral degree I could figure out stenciling. I was clearly on a bad decision roll.

When the armoire was dry I centered my stencil on the first armoire drawer and prepared to have a Martha Stewart moment of DIY perfection. Using a foam brush I stippled, waited for it to dry, then removed the stencil. 

My tribal triangles resembled nothing so much as blobs. My stippling had bled terribly. I re-sanded and re-painted the drawer then watched a couple Youtube videos on stenciling. I found a scrap piece of wood to practice my stenciling until I had mastered a "rustic" rather than "terrible" look. This involved a two-step technique of stenciling using small art brushes instead of my foam brush then cleaning up any blurred edges with a damp Q-tip.

Cat butt approved
Feeling much more confident I applied this technique to the armoire, rinsing and drying the stencil between each use to prevent any unwanted paint transfer. Since I only had half a stencil it took 18 individual applications over a period of two days. It was a true labor of love and one I do not care to repeat.

Once the stenciling was finished I ordered a sampling of
knobs online. I ultimately chose a faux-bamboo knob in rubbed bronze. Even better, the style was being discontinued so it was deeply discounted.

The full-length closet now holds our tent, two sleeping mats, two folding chairs, two tennis rackets, two bowling balls, and all our camping culinary equipment with room to spare. The mirrored cubby holds my gardening kit and bocce set, while the drawers hold my art supplies and other odds and ends. Given the vast amount of storage offered by a relatively small piece of furniture, I'm pretty sure it's a magical armoire. 

Learning to stencil furniture was a humbling experience. It required much wine and some physical scars to get through it, but the armoire is a great conversation piece and something I've received many a compliment on thus far. It's fun and different and I look forward to refinishing it many more times over the years.

Next time I decide to stencil something, though, I think I'll invest in a pre-made stencil. I love DIY, but there are some things you should just leave to the professionals.